Basic Concept
Spring Setup
Spring Boot
Mastering REST APIs in Spring Boot: A Comprehensive Guide for Quick and Efficient Development - Part 1
Welcome to the Spring Boot REST API development series. This series consists of several parts. To make things easy I have started building with static Rest API then added different layers to define relationship and responsibilities of various classes and components. Creating a simple REST API in Spring Boot involves setting up a Controller class and a Model class (such as the Student class in this case).
Mastering Spring Boot: Adding Business Layer - Part 2
Mastering Spring Boot: Adding Data Access Layer - Part 3
Mastering Spring Boot: Building CRUD REST API - Part 4
Mastering Spring Boot: Exception Handling - Part 5
Create a Spring Boot Maven Project
-
Use Spring Initializr (https://start.spring.io/) or your IDE to create a new Maven project with the following settings:
- Group: com.javakar
- Artifact: javakar-static-api-example
- Dependencies: Spring Web
-
Generate the project and download the zip file.
-
Extract the contents of the zip file to your preferred project location.
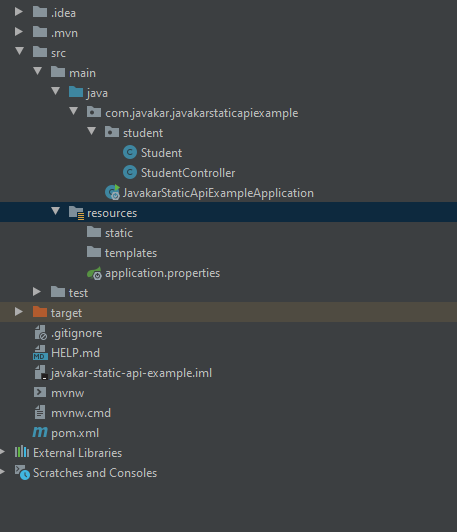
Project Structure
Following snippet is showing the project structure, file and folder tree
pom.xml File
Maven is a popular build automation and project management tool used primarily for Java projects. It simplifies the process of building, managing dependencies, and deploying applications.
<?xml version="1.0" encoding="UTF-8"?>
<project xmlns="http://maven.apache.org/POM/4.0.0" xmlns:xsi="http://www.w3.org/2001/XMLSchema-instance"
         xsi:schemaLocation="http://maven.apache.org/POM/4.0.0 https://maven.apache.org/xsd/maven-4.0.0.xsd">
    <modelVersion>4.0.0</modelVersion>
    <parent>
        <groupId>org.springframework.boot</groupId>
        <artifactId>spring-boot-starter-parent</artifactId>
        <version>2.7.14</version>
        <relativePath/> <!-- lookup parent from repository -->
    </parent>
    <groupId>com.javakar</groupId>
    <artifactId>javakar-static-api-example</artifactId>
    <version>0.0.1-SNAPSHOT</version>
    <name>javakar-static-api-example</name>
    <description>Demo project for Spring Boot</description>
    <properties>
        <java.version>11</java.version>
    </properties>
    <dependencies>
        <dependency>
            <groupId>org.springframework.boot</groupId>
            <artifactId>spring-boot-starter-web</artifactId>
        </dependency>

        <dependency>
            <groupId>org.springframework.boot</groupId>
            <artifactId>spring-boot-starter-test</artifactId>
            <scope>test</scope>
        </dependency>
    </dependencies>

    <build>
        <plugins>
            <plugin>
                <groupId>org.springframework.boot</groupId>
                <artifactId>spring-boot-maven-plugin</artifactId>
            </plugin>
        </plugins>
    </build>

</project>
Create the StudentController.java class
We have annotated StudentController.java class with @RestController, which tells Spring that this class will handle web requests and will return the response in a format required for RESTful APIs.
import org.springframework.web.bind.annotation.GetMapping;
import org.springframework.web.bind.annotation.RequestMapping;
import org.springframework.web.bind.annotation.RestController;

import java.util.ArrayList;
import java.util.List;

@RestController
@RequestMapping("/api")
public class StudentController {

    @GetMapping("/students")
    public List<Student> getAllStudents(){
        List<Student> students = new ArrayList<>();
        students.add(new Student(1, "Aamir", "aamir@aamir.com"));
        students.add(new Student(2, "Shayan", "shayan@shayan.com"));
        students.add(new Student(3, "Kashif", "kashif@kashif.com"));
        return students;
    }
}
The @RequestMapping("/api") annotation used in the above StudentController.java class specifies the base path for all endpoints.
The @GetMapping annotation is used to handle HTTP GET requests. The getAllStudents method returns a list of Student objects. In this example, the data is hardcoded, but in a real-world scenario, you would fetch this data from a database or another data source which we have done in part 3 of this series.
Create the Student.java class
This is a simple Java class representing a Student. It has private fields (id, name, and email) along with standard constructors and getter methods.
public class Student {

    private Integer id;
    private String name;
    private String email;

    public Student(Integer id, String name, String email) {
        this.id = id;
        this.name = name;
        this.email = email;
    }

    public Integer getId() {
        return id;
    }

    public String getName() {
        return name;
    }

    public String getEmail() {
        return email;
    }
}
Run the Spring Boot Application
This is the main application class annotated with @SpringBootApplication. It tells Spring Boot to start adding beans based on classpath settings. The main method launches the Spring Boot application.
import org.springframework.boot.SpringApplication;
import org.springframework.boot.autoconfigure.SpringBootApplication;

@SpringBootApplication
public class JavakarStaticApiExampleApplication {

    public static void main(String[] args) {
        SpringApplication.run(JavakarStaticApiExampleApplication.class, args);
    }
}
Check API response
Once your application starts successfully then hit this URL to get the response http://localhost:8080/api/students
[
    {
        "id": 1,
        "name": "Aamir",
        "email": "aamir@aamir.com"
    },
    {
        "id": 2,
        "name": "Shayan",
        "email": "shayan@shayan.com"
    },
    {
        "id": 3,
        "name": "Kashif",
        "email": "kashif@kashif.com"
    }
]
Aamir Shayan
Software Engineer